 http://lyrickinard.blogspot.com/2010/10/tutorial-beaded-fringe.html
Materials:
- Something to add fringe to: gadget case, scarf, your husbands favorite necktie. In any case it will need to have enough "oomph" to support the fringe. In this instance, the fringe will be supported by the satin stitched bottom edge of the case. For a scarf I like to add a tiny bit of cording or seam tape or ribbon (depending on the weight of the scarf) inside of a rolled hem.
- Beading thread (I love Nymo) and a beading needle (or a size 11 applique needle.)
- Seed beads and other larger beads. Make sure the holes in the larger beads are not so big that the seed beads sink into them. If they are you'll need to put medium beads next to the large holed beads.
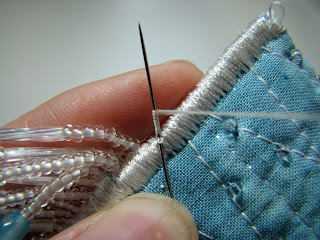
1 - Make your knot. Thread your needle, bring it in through the case and out on the edge of the satin stitching. Leave the tail of the thread hanging out. Wrap the thread (not the tail end) three times around the tip of the needle, hold the wrap with your thumb and pull the needle through. You should have a secure knot now. I often make at least one more knot in close to the same place just to be extra secure.
2 - Load your beads onto the needle. Add seed beads until your fringe is about as long as you wish it to be then add your bigger bead and one more seed bead. The seed bead on the end is your anchor. Slide all of the beads to the end of the thread.
3 - Anchor your fringe. This is the only tricky part - and it really isn't hard. Slide that last seed bead away from the line of beads then send your needle right back through your whole line of beads. I find it easiest to do if I bend the line of beads over my finger, holding the thread taut. This lines up the beads in a row and holds the thread tight along the bottom of each hole. That way you have room to get the needle back up through the whole line.
4 - You might not be able to get the needle all the way through your line of beads in one shot. No worries. Just do it a bit at a time, holding that thread taught to it easier to slide the needle through.
5 - Push your needle into the satin stitching, right under your fringe and come out where you want the next fringe to start. Continue adding fringe until you think you're done. Notice here that my fringe isn't the same - I like it funky. Sometimes my big bead is in the middle, sometimes there are more seed beads on the end than just one anchor. Mix it up and make it fun.
6 - Make a knot right next to the last fringe in the same way you did at the beginning. In fact, make two knots. Come to think of it, make a knot and just keep going (not starting with a new thread each time) every three or four fringes just to be safe. I truly dislike the sound of a million tiny beads scattering across the floor as my child yanks on my fringes. At the end, after your last knot, send your needle up through the satin stitching and come out anywhere. Trim the tail off and you're done.
There you have it. Next week I'll post a short tutorial on how to make the ribbon strap shown on the butterfly case so be sure to stop by again!


No comments:
Post a Comment